Dealer Edge Quick Start
Get trading in 5 minutes. This guide is for new users who want to start immediately.
The 60-Second Version
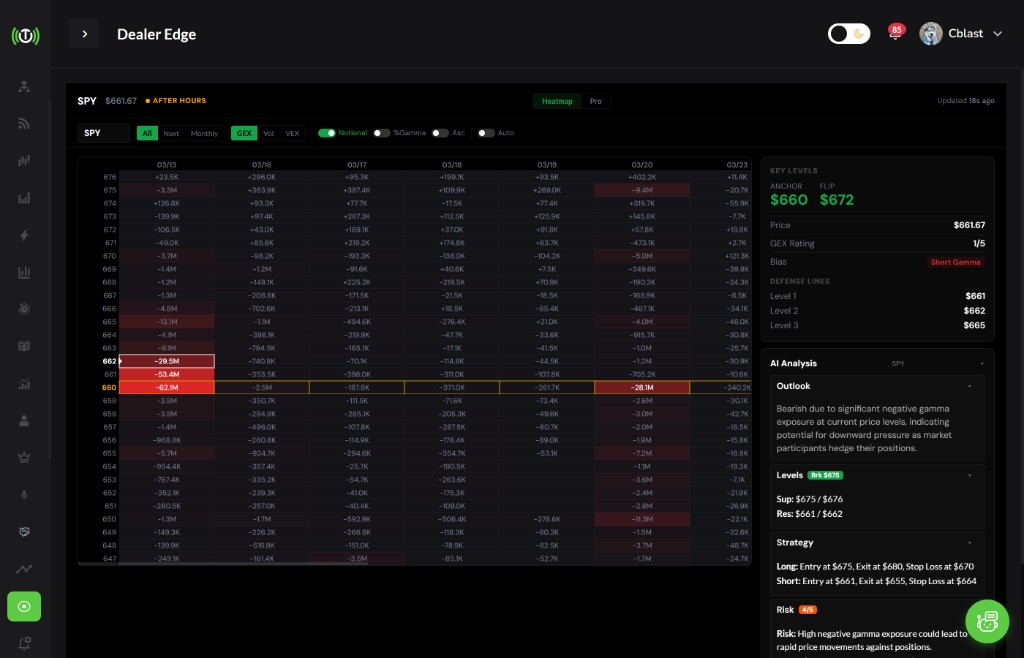
Step 1: Find the Brightest Tile = Your Anchor
Look for the brightest green/blue tile on the heatmap. This is where price wants to go - the Anchor Point.
Step 2: Where is Price vs Anchor?
- Price BELOW anchor - Bullish - Buy calls or bull spreads
- Price AT anchor - Neutral - Sell premium (iron condors)
- Price ABOVE anchor - Bearish - Buy puts or bear spreads
Step 3: Check the GEX Rating
- 5/5 or 4/5 - Buy calls
- 3/5 - Iron condors (sell premium)
- 2/5 or 1/5 - Buy puts
Step 4: Trade According to the Rating
- Anchor = Direction
- Rating = Strategy
- Stick to the system.
What is GEX?
GEX (Gamma Exposure) measures the hedging pressure market makers must apply as price moves.
Because dealers are net short options, they hedge constantly:
- Above a high-GEX strike - Dealers SELL - creates resistance
- Below a high-GEX strike - Dealers BUY - creates support
Result: Price gravitates toward large positive gamma levels.
How to Read the Heatmap
- Each tile = strike x expiration
- Brightness = strength of gamma magnet
Color Meaning
- Positive Gamma (Green/Blue): Stabilization - Price gravitates to these levels
- Negative Gamma (Red): Volatility - Price accelerates through these levels
Key Patterns
- Vertical Walls: Strong multi-day support/resistance
- Horizontal Bands: Expiration clusters (OpEx magnets)
Understanding Key Levels
1. Current Price
Shows your real-time position relative to the anchor.
2. Anchor Point
Highest gamma exposure - strongest magnet for price.
3. Defense Lines
Secondary levels (60-80% of anchor strength). These are backup support/resistance.
4. GEX Flip Point
Where gamma shifts from positive to negative.
- Below flip - stable
- Above flip - high volatility
GEX Rating System
| Rating | Bias | Strategies |
|---|---|---|
| 5/5 | Very Bullish | Calls, bull spreads, CSPs |
| 4/5 | Bullish | Bull put spreads, defined-risk calls |
| 3/5 | Neutral | Iron condors, calendars, butterflies (most common) |
| 2/5 | Bearish | Bear call spreads, long puts |
| 1/5 | Very Bearish | Long puts, bear put spreads |
Your First Trade (Step-by-Step)
- Open DealerEdge - Find the brightest tile = anchor
- Check Current Price - Above anchor = bearish, below anchor = bullish, at anchor = neutral
- Check Rating - Example: 3/5 = Neutral - Sell premium
- Pick Strategy - 3/5 = Iron Condor
- Execute - Example setup:
- Sell 6600 put, Buy 6590 put
- Sell 6700 call, Buy 6740 call
- Credit ~$2,000, Risk ~$8,000
- Manage - Take profit at 50%, stop if price breaks protection wings, re-check GEX daily
Common Mistakes to Avoid
- Fighting the Anchor - Price gravitates toward the anchor
- Buying Premium in 3/5 - Neutral = SELL premium, not buy
- Ignoring the Rating - Rating = strategy. Don't override it with emotion
- Misreading Positive Gamma - Positive gamma = stability, not bullishness
Quick Reference
5-Second Decision Tree
- Price ABOVE anchor - Bearish - sell calls / buy puts
- Price BELOW anchor - Bullish - buy calls / sell puts
- Price AT anchor - Neutral - iron condors
Quick Checklist
- Found anchor
- Checked price vs anchor
- Checked rating
- Selected matching strategy
- Placed stop at next GEX level
- Adjust daily
5 Golden Rules
- Anchor is King
- Above anchor = bearish; below anchor = bullish
- Rating dictates strategy
- Neutral = sell premium
- Update daily